Texturing
Applying
a texture
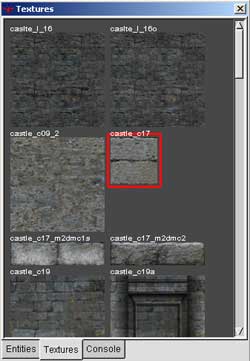
The simple method is to first go to "textures" and then
chose a set to load. Ive chosen "castle" then "castle
wall". Then you need to get up the texture window, you may
already have it displayed, if not you need to press "t".
Then you need to click the texture you want. Ive chosen "castle_c17"
a red line with appear around the texture.
Now if you create your brush the texture will appear on all its
faces.
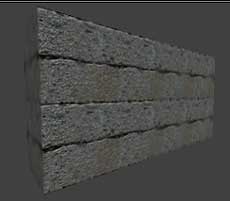
As you can see ive made a wall, this is one method of doing things.
You might want to make your brush first, then select it, load a
texture set, and apply a texture, its just what you feel like doing,
it makes no difference what way you do it really. However its best
to make a brush out of caulk then texture the faces that will be
visible as caulk isnt drawn in game and saves on rspeeds.
Changing the size of a texture
Once you have applied a texture you will probably want to change
its size to how you want it. This is achieved by using the "surface
inspector"
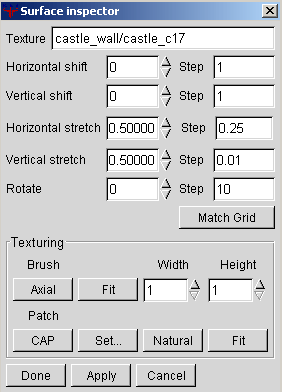
If you press "s" the surface inspector window pops up.
You can either have your whole brush you want to change selected,
or just one face or multiply faces:
hold ctrl and shift then left click a face
= select a face
hold ctrl, shift and alt then left click faces
= select multiply faces
shift left click the brush = selects
the entire brush.
You can see the various properties in the surface inspector. Which
we can discuss:
| Texture |
Name
of the texture currently on brush, you can type other
texture names from any pack, which will appear once you
change another value |
| Horizontal
Shift |
This
is how far your texture will move left and right when
you use the arrow images, it says "step" you
might notice, this is how many steps the horizontal shift
will move. So if step reads "10" then one press
on the arrow will move to 10, then press it again it will
go to 20, then 30, etc. |
| Vertical
Shift |
Exactly
the same as horizontal only for height |
| Horizontal
Stretch |
This
will enlarge and decrease the size of the texture, again
with the step, this is how much it will step, i.e. If
step is 0.01 when you use the arrows the value increases
by 0.01 each time. |
| Vertical
Stretch |
Exactly
the same as above only for vertical stretching |
| Rotate |
Rotates
the texture around |
| Match
Grid |
You
can click this to match up to the grid size in the step
columns. |
|
(note that these dont work for patches, just normal brushes)
Texturing section
| Brush |
| Axial |
if
you have a texture that you have rotated and now want
it back, you can press this to reset it. It resets the
brush to the original settings too. |
| Fit |
Here
you can fit the texture onto the brush, also in the width
and height boxes you can enter numbers, to which it will
fit to that size. |
|
| Patch |
| Cap |
Admittedly
I looked this up for a more detailed description in the
manual, hence I quote "used to fill in the gaps between
curves and solid geometry" |
| Set |
You
can enter in the pop up box values so the texture is repeated
over the patch |
| Natural |
Often
a very good method, it nicely places the texture in a
more natural format and removes some stretching you might
have |
| Fit |
Fits
the texture on the patch |
|
You can also for patches get up another texture window by pressing
shift and s. It has similar properties only for patches only.
Problems, Comments, Queries > Forum
Tutorial by eyeronik
