The Basics
of Moving a Brush
Moving a brush in RTCW requires a few different entities. It also
requires an .ai file and a .script file for your map. In case you
don't know, .ai and .script files are basically just text files
that accompany your map and that have the same name as it. In these
text files are instructions that you, the mapper, write that tell
the game to do specific things. As you might have guessed, the .ai
file tells the AI and things dealing with the AI to occur, and the
.script file covers just about everything else. Although this tutorial
teaches you how to move a brush, you can apply many of the concepts
here to other things, as well. In other words, this could also almost
be thought of as a general script tutorial, as well.
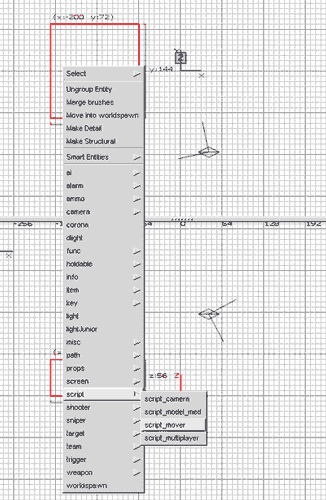
First off, create the brush that you want to move. It can pretty much be anything. Also be sure to cover it with an appropriate texture. Please be aware that this is not an object the player will be able to push, this is just something that will move on its own to a specified destination when triggered. After you create the brush, select it and then right-click on it in one of the 2D views. In the menu that appears, point to script, and then click on script_mover. See the screenshots below.
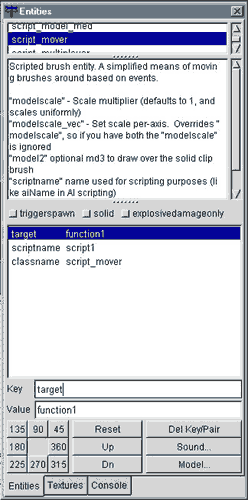
You have now just turned this brush into an entity, a script_mover
to be exact. Now select it again and hit 'N' to bring up its properties.
First, check the Solid flag if you want it to be a solid object.
If you don't check this the player and anyone else will be able
to walk through it. Then, you must add two key/value pairs. The
first will key will be scriptname with a value of whatever you want.
Just make sure you remember it later. For our purposes we'll use
script1. This key tells the script_mover which code block to reference
in the .script file. I'll explain that more later. Next, add a key
of target with a value of, once again, whatever you wish. This will
tell the script_mover which function to call within the code block
you specified above. Let's call this function1. You're properties
window should now look similar to the one below.
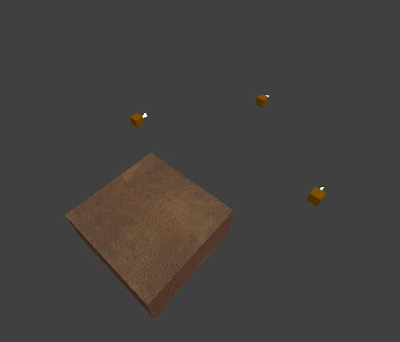
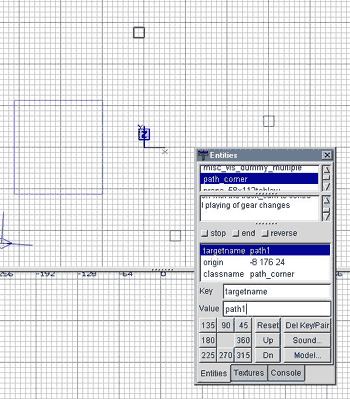
Before the next step, decide where you want this brush to move to
exactly. Plot out a course in your mind. Then, right-click in any
2D view and point to path, then click on path_corner. This is simply
an entity of location. Place this at any point to which you want
your script_mover to go. You can place as many as you want. Then
select each one and enter one key: targetname, with a value of whatever
you want, say path1. Make sure each one is different, of course.
See the screenshots below to see my script_mover and all of its
path_corners. One of the path_corner's properties window is open,
as well.
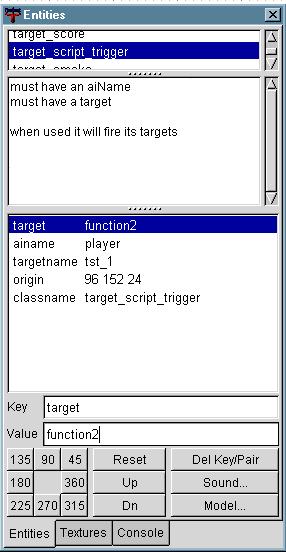
Okay, the next entity to insert is a target_script_trigger entity,
located in the target group. Insert one of these, and place it wherever
you want - its location doesn't matter. Give it a key of ainame
with a value of player (it must be this), and a key of target with
a value of whatever you want, say function2. Also give it a key
of targetname with a value of whatever you want. Let's call it tst_1.
See the screenshot below.
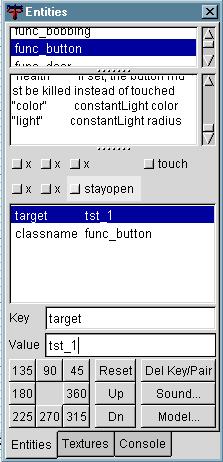
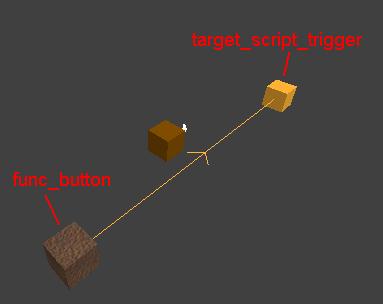
The last entity you need to insert is a func_button. This is a brush-based entity, so first make a brush that'll be your button. Also make sure to put it in a location that the player will be able to access. Then select it, right-click in a 2D view, point to func, and then click func_button. Now select it again, and hit 'N' to bring up its properties. Give it one key: target, with a value of the targetname of the target_script_trigger, in this case tst_1. This should connect the entities, and a line should then be drawn between them in the editor. Now, when the player uses the button, it'll activate the target_script_trigger. The screenshots below show the button's properties and the func_button and target_script_trigger linked together.
Okay, now save and compile your map, and quit the editor. The rest
of the work will be with the .ai and .script files, which shouldn't
be too hard. Go to your RTCW\Main\maps folder, and make a new .txt
file. Put in the information like how it is in the screenshot below.
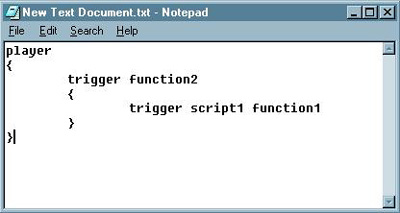
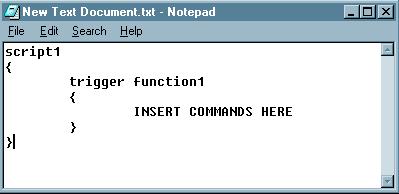
Then save it, and rename it to yourmapname.ai. Now let me explain what we just did. Each block of code, or code block, is set off by braces ({ and }). Above each set of braces is the name of the code block. In this case, it's player, because this applies to the player. This is the only case where you can NOT decide the name of the code block - it MUST be player. As you may recall, this is the value we gave to the ainame of the target_script_trigger. We were telling it to call this code block. However, we also gave it a target of function2. This specified which function to call within that code block. It's sort of like a mini code block within the bigger one. You may also realize that I put the word trigger in front of function 2. However, we did NOT include that word when putting this in the editor. This is only for the text file. The indentation does not matter, it's just there to help make things organized. So, the player hits the func_button, which targets the target_script_trigger, which calls the player code block and the function2 function. As you can see, there is one line of text within that function, trigger script1 function1. This tells it to trigger the script1 code block and the function1 function within that code block. We are going to make this in a second. However, it'll be in the .script file instead, NOT the .ai file. So, make another .txt file in your \maps folder and open it. Once again, make it like the screenshot below, except for the part where I said INSERT COMMANDS HERE. Leave that blank, as it will be to your discretion.
Once again, save it, and rename it to yourmapname.script. As you can see, we have the script1 codeblock with the function1 function within it. These were targeted by the command in our .ai file. Targeting the function1 function then runs all of the commands within it. These, finally, tell your script_mover what to do. There's a lot of possibilities. For example, typing gotomarker path1 50 would tell it to go to the path1 path_corner at a speed of 50. Wait 4000 would tell it to wait 4 seconds before performing the next command. It's 4000 because it's measured in milliseconds. So for 4.5 seconds just put 4500. You can also put faceangles x# y# z# time#, and it will turn to the given xyz co-ordinates in the specified amount of time, again measured in milliseconds. For example, you could put faceangles 0 180 0 1500. Just make sure you only put one command per line, and then the script_mover will execute them in order. Here's an example of a full .script file with commands:
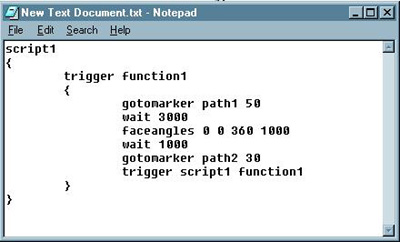
As you can see, the last line of the commands will call the same function again, and will thus start the process all over again, effectively creating a loop. If you wanted it to stop at its final destination, just take out that last line.
That's
about it. Now, when you the player hits the button in-game, it should
target the target_script_trigger, which calls the function2 function
within the player code block in the .ai file. The function2 function
then has a command in it that calls the function1 function in the
script1 code block of the .script file. The commands there then
actually tell your script_mover entity what to do and where to go.
Problems, Comments, Queries > Forum
Tutorial by randy
