AI
Marching script
This tutorial is to show you how to make any ai monster follow a path.
This does require some scripting. Also note, you need to make two
.aas files as they contain the
information for the bots to navigate etc.
If your making a single player map, chances are you need to have some
ai marching or following a path at some stage. Its not that hard to
do but hard to get into and understand.
| 1. |
First
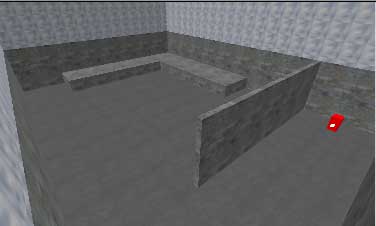
thing we need to do is create our bit of world to test them
out. Ive make a simple L shaped platform and a wall in front
of the player so the ai cant see him when he spawns so you can
check the ai out otherwise he would turn nasty and attack you.
The best way to follow this tutorial is to download the .map
file here
It looks like in Fig 1.0 and Fig 1.0a
(Fig 1.0)
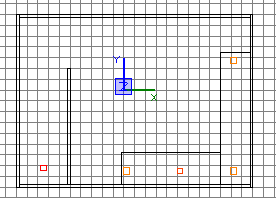
(Fig 1.0a) Top Down View
As you can see in my haste ive made it on too smaller grid,
I usually use grid size 5 but for some reason for this one didnt,
since your doing this tutorial you should already know about
grid sizes anyway, but if not dont do what I did above, stick
to large grid sizes when possible. Anyway our solider is going
to walk along that raised platform you see in fig 1.0, he is
also going to stop at the ends and turn to face as if he is
marching.
|
| 3. |
Once
you have your map
file, we need to first create where our ai should be going.
For this we need to use "ai_markers".
First off right click and chose "ai" then "ai_marker"
from the list. What you need to do is place three on the platform,
just pop them in like in Fig 1.1
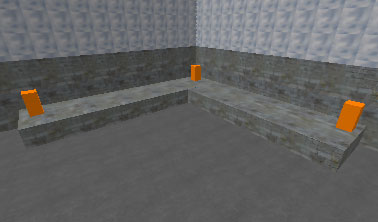
(Fig 1.1)
|
| 4. |
Now
what we need to do is give them all names. On Fig 1.2 select
that ai_marker circled in red first and press "N"
to bring up its properties and give it a key of "targetname"
and a value of "point1"
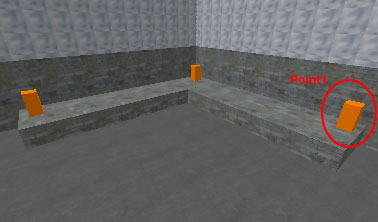
(Fig 1.2)
Our first ai_marker now has a name, we also need to give it
an angle to be on the safe side so he knows which way to go
when he gets there, although im not 100% sure its necessary
it didnt seem to work right without it.
For "point1" ive given it an angle of "360"
(Fig 1.3) by pressing the 360 button. I chose this because on
my map in relation to the top view, 360 is the direction to
walk after he gets to that marker. Although for the other point
in the middle he come be going any direction, I dont think it
matters about the angles its just when I tried without it didnt
work that time.
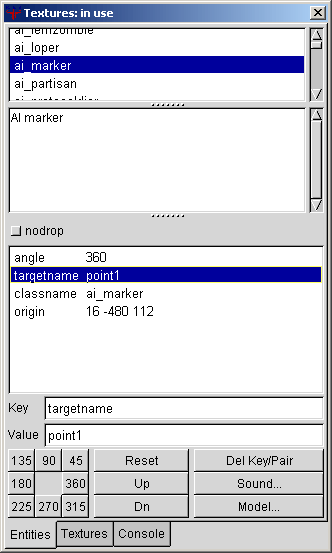
(Fig 1.3)
|
| 5. |
You
dont need to worry about any of the other settings apart from
angle and name.
We now need to give the other two ai_markers names and angles.
Ive tried to explain it best I can in this high quality picture,
note that we havent yet put in the actual ai:
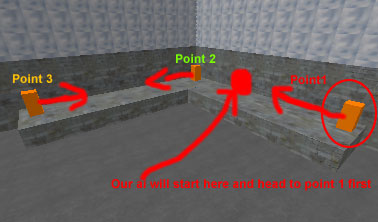
(Fig 1.4)
Hopefully you can understand the jist of it. The red blob will
be where we place our actual ai, which will be a soldier (ai_soldier).
He will then move to point1 first, so point1 has an angle that
directs him back to point2, then point2 leads to point3, then
point3 leads back to point 2, so its his patrolling path that
we have effectively marked out using the ai_markers
|
| 6. |
So
give the ai_markers the correct names, point1, point2 and point3
like in Fig 1.4, point1 has a angle of 360, point2 has an angle
of 90 and point3 has an angle of 270.
If you have made your own map to do this and not used mine then
it depends what direction you made the map in to what the angles
will be. Direct them like in Fig 1.4
|
| 7. |
So
now we should have the ai_markers all ready to go. What we now
need to do is to put input our actual ai.
Im going to put in a solider. What you need to do is right click
and chose "ai" then "ai_soldier" ive placed
him like in Fig 1.5, he is the long orange rectangle
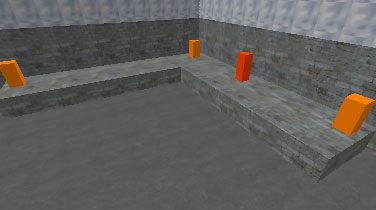
(Fig 1.5)
|
| 8. |
Now
we need to change some of the soldiers properties, select the
solider and press "N" to bring up the entity window.
The first thing we need to give him is a name. To do this you
give ai names of "ainame" in the value then name them
in he key. Ive entered "ainame" then in the key put
"nazi1" this is essential, the script will refer to
this name to get everything working.
Ive also given him an angle so he is pointing to "point1"
at the start, I pressed the "180" button because thats
what way in relation to the top view he needs to face.
You can chose your model for the ai_soldier too, ive entered
"head" "escape3" and "skin" "infantryss/default"
im not sure if you have to enter these, if you dont it will
probably just use a default head and skin.
Thats all we need to enter for the ai_soldier, your screen should
look like Fig 1.6
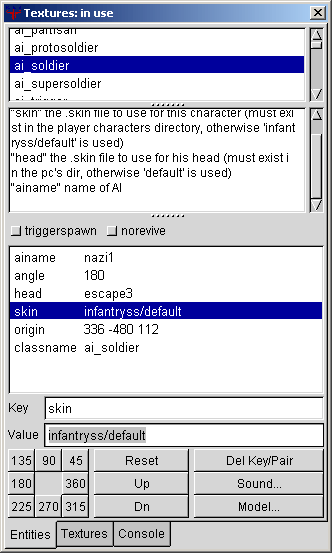
(Fig 1.6)
|
| 9. |
Now
we have three ai_markers all with names and angles, and a ai_soldier
with a name and an angle, what model and skin to use etc.
Thats all you need in the map. Save your map as "aitest"
|
| 10. |
Put
your map to one side now, we now need to make our script, which
is in fact classed as a ai file not a text script so to speak.
First thing you need to do is get a ai file from a pak or someplace,
any file that says its an ai file.
I chose "escape1" for mine as it came with the editor.
Now copy it, then rename the file the same as your map "aitest",
open up the file (right click, open with, notepad) and delete
the contents and save.
Now we have our own blank ai file called "aitest"
|
| 11. |
Now
ive tried to make this as simple as possible, I myself used
the example marching script to understand it so its virtually
the same as that. My entire ai file looks like this:
|
nazi1
{
attributes
{
aim_accuracy 0.75
attack_crouch 0.1
idle_crouch 0.1
}
spawn
{
trigger nazi1 marchloop // This will begin the Marching
loop.
}
trigger
marchloop
{
walktomarker point1
walktomarker point2
facetargetangles point3
wait 4000
walktomarker point3
wait 4000
trigger nazi1 marchloop // Restarts the marching loop.
}
death
{
}
enemysight
{
}
}
|
So there we have our ai file. Its quite simple, on the player
spawning our soldier (nazi1) is triggered into following the
the script
You may as well copy the script above into your ai file and
save it. Some people have reported when they cant get the script
to work adding another "}" to the end fixes it, although
this script works fine for me and other people so im not sure
why some people get that problem.
Example files are here
includes ai file, map and bsp file.
|
| 12. |
You
should now have your map named aitest, containing 3 ai_markers
and an ai_soldier as well as your ai file called aitest. What
we now need to do is compile aitest, you should already know
how to do this, if not see here
Now Just do a normal full compile.
Once that is compiled for any other type of thing you would
be finished, but our bot needs to have some information about
the map from the bsp. He will not work without it. So go onto
the next step and learn how
to make your .aas files.
If you get an error pop up in the yellow box saying "expected
{" found end, or something similar then this is a script
problem and you might of gone wrong someplace. First check the
AI script and see if the brackets are indeed in the right place
and also check in the map to see if you named the ai_solider
correctly. If it still doesnt work ask on the forums. Dont forget
you can download the files from this tutorial here
|
Problems, Comments, Queries > Forum
Next Tutorial -> How to
make .aas files
Tutorial by eyeronik
|
