|
Simple Scriptmover(part1:splines)
Script Movers can be very useful to create dynamic objects in levels and add interesting
objectives to your map. So what exactly is a scriptmover, well the name says most of it,
it is an object that is scripted(or programmed) to move around. It can be anything from a
tank, train, truck, or maybe a fan or a moving ladder, the mover is only limited to your imagination.
Now the script for the mover is inside the level's script file which is located in the etmain/maps directory
named [themapname].script. The script allows us to tell the mover exactly what do, from moving the
mover when its triggered and telling it where to go, to stopping the mover if its damaged or if a player
isn't close enough to it. This tutorial will be based on the tank mover from goldrush, where the tank will
simply follow a set path on its own.
Make sure you have a working map before starting this tutorial.
Creating a Spline Path
- First of all we need to lay out our path for our script mover to follow, for this we use the
info_train_spline system (you can use path corners but splines are much more easier for vehicles).
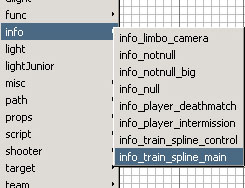
First right click on the main window(with xy view shown, and grid 8 selected), select info >
info_train_spline_main. A green box appears in the main window.
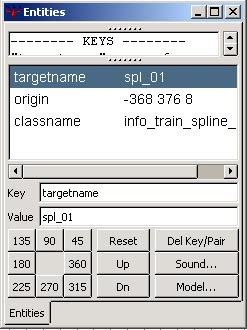
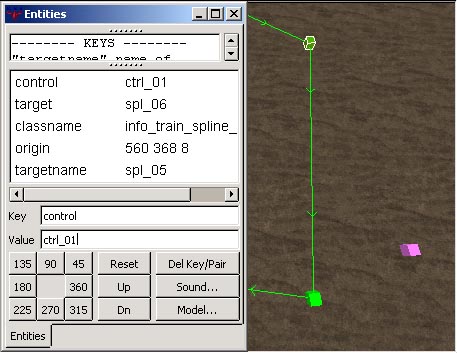
- Press n to show the entity window. Now type in the following key, value pair. Key
targetname , value spl_01 . The value can be any name you want but try to have a
good naming system with numbers since we are going to have many splines in a row.
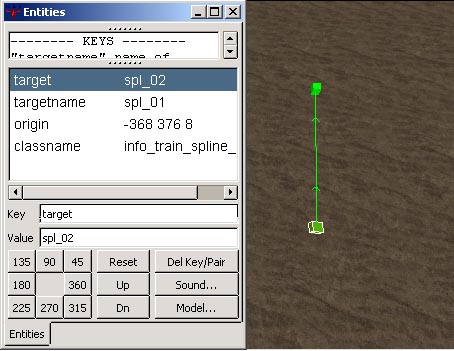
- Exit the entity window, deselect the current spline(Esc), and again repeat step one and two and create
another spline, this time give it a value of spl_02. Place this spline about 200 units away from the
first spline.
- Now we are going to make a path from spl_01 to spl_02. Deselect spl_02 and select spl_01 and open its
entity window again. Now type in the key target, value spl_02.
- Keep repeating steps one to four until you have a path that your happy with. Each time you create a new
spline increase its value by 1, go to the previous spline and make it target the current spline.
- For the last spline of your path you have two choices, you can either make it loop back to the first spawn
by making it target spl_01 or you can choose to have the path stop and not include a target key. For me I will
loop it back to the first spawn.
- If we look at our spline paths now it looks a little rough, with some sharp angles between splines. To counter
this the spline system has a spline_train_main_control which helps to make the path alot more smooth. Inbetween two
splines right click, info > info_train_spline_control. Open up the entity window and give the control a key
targetname, value ctrl_01.
- Go to the spline previous to the control and in the entity window give a key control , value
ctrl_01.
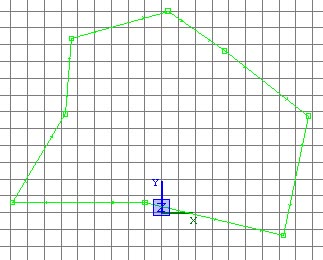
- Built in the Radiant 1.4 or above is a handy plugin that lets us exactly see what the path looks like. In the top
menu goto Plugins > bobtoolz > Plot Splines. In the 3D window you will now see a
white line which is shows the exact path. If the line doesn't appear then your splines are not correct, most likely
your targeting a spline that doesn't exist or there is an issue with your spline_controls.
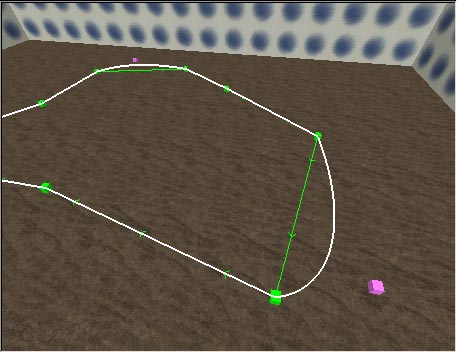
- Continue adding,editing your splines and using Plot Splines until your happy with the layout of the path. Also
check out the Spline Path System in the Level Designer's Reference(LDR) in the top menu help >
Wolfenstein:Enemy Territory > ET:level designers reference.
Continue to part 2: tanks.
Problems, Comments,
Queries > Forum
Tutorial by ausman
|
