Making your first room
Prerequisites before completing this
tutorial:
Getting Started
Basic Construction
- Load up Radiant, set your grid up, i'm using size 16, just press 5 or go into
grid > Grid 16.
- Now load up the common textures, go into textures > common then click on
the caulk texture in the texture window. This is done so that when we make our brushes
they will be textured as caulk default. Also make sure the window is in the xy view
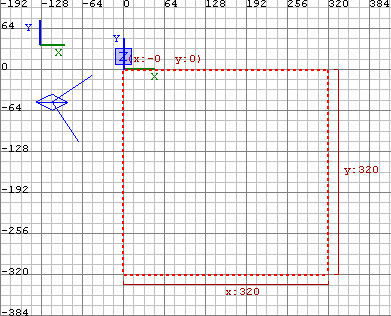
- Create a brush 320x320x16, this is our floor. To do this look at the grid
numbers and left click and drag out a box 320x320 in top view. Then in a height view
window make it 16 units high, which is one grid unit. If you press 'q' when the brush is
selected you can see the dimentions of the brush.
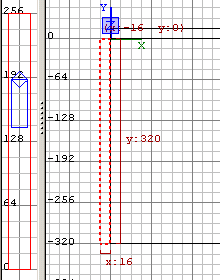
- Now we'll create the walls. Make a brush that's 16x320 and 256units high. Move this
brush up 1 unit on the z axis. With the brush still selected, press space
bar(which duplicates the brush), press the z-axis rotate
button(which rotates the brush by 90 degress) and position the brush so that it is
flush with the floor. Do the same to create the other walls.
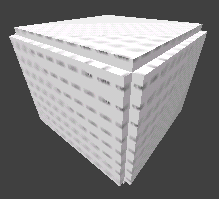
- Now we need a roof. Select the floor, press 'spacebar', then drag the duplicate up using the z-axis until
it is flush with the top of the walls. You should now have a cubed room.
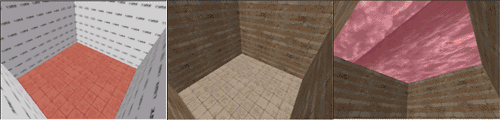
- Now we should texture it. In the 3d view position the camera inside the room,
then press ctrl alt shift left click in the camera window and select a face of the floor.
Now load up some textures, i'll use a floor texture from the egypt floors.
Goto Textures > egypt > egypt_floor_sd and select block-16sq.
Now deselect the floor by pressing escape, and select the 4 wall faces
(using ctrl alt shift and left-click). Load up the egypt wall textures by
going to Textures > egypt > egypt_walls_sd and select stripedbrick01.
Lastly the roof needs to be textured. In this case I will use a skybox
texture. Select the roof face and load Textures > fueldump and apply the
fueldumpsky texture. The sky might not look very real or textured badly but
because this texture has shader properties with it, when seen in game it will look
much more realistic.
- Next we need to add some entities.
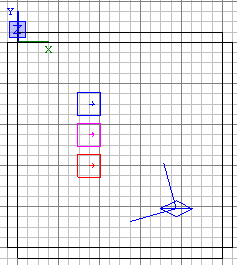
- First we need an info_player_deathmatch.
This entity is where spectators first spawn when entering the game. To get this right
click the 2d view and select info > info_player_deathmatch.Move it to the
centre of the room and position it just above the floor.
- Next we need the spawns for the axis and allies. For the axis right click 2d view,
team > team_CTF_redspawn and for the allies goto team > team_CTF_bluespawn.
Position these two entities next to the info_player_deathmatch.
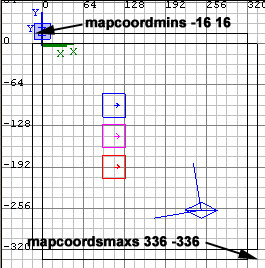
- In Enemy Territory we have to give our map mapcoordinates that are used for the
command map and the compass etc. To do this we need to input the values into our
worldspawn of the top left xy cordinates and bottom right coordinates.
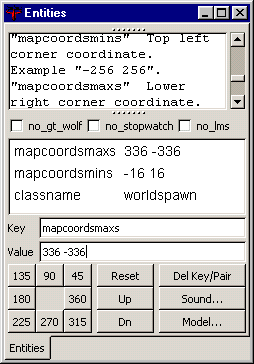
Click on any brush (except for the entities) then press 'n'. The entity window will
appear. Now in key field type mapcoordsmins and in the value field
type in the lop left coordinates of your map, which in my case is-16 16. Now we have
to do the bottom right cordinates. In key type mapcoordsmaxs and in
the value field type in the bottom left coordinates, which for me is
336 -336. Now its a good idea if these coordinates are square. A simple way to do
this is to create a brush from your mapcoords, if both sides of the brush are the same
then its a perfect square naturally. It is important for it to be square when later in
your map you have to produce tracemaps and command maps.
-
- Lets save the map now as test_tut.map. Save it in ...etmain/maps/test_tut.map folder.
- Next it's time to compile the map. In the bsp menu there are a whole list of
compile options. For this compile choose Q3map2(test)BSP -meta -vis -light -fast
-filter. Three consols will appear in series and the compile is finished
when 'Connection closed' is displayed in the console window. If you get a map
leaked error, then either your room isn't completely sealed off from the
outside void or your map is missing an info_player_deathmatch(other errors
can occur when your map gets more complicated but for now these are the only
errors u could/should get).Time to go test!!
When ET loads, press the tilde ` key, the console then
gets pulled down. Next type these commands that are in bold,
g_gametype 2
sv_pure 0
devmap map_name*
*Substitute the name of your map here etc. devmap test_tut.
The map will then load. If it freezes when you try to move then your map
coords are wrong and you might a have to reposition them. If your map freezes
when you try to select a side, then your missing the axis and allies
spawns(team_CTF_redspawn,bluespawn). Hopefully you now have success!!! Problems, comments, queries > Forums
Tutorial by Ausman
|
