Explosive
Objectives
This tutorial will teach you how to add tow objectives
to a multiplayer wolf map.
| 1 | First
off we need to make our objectives. Ive made too shoddy looking
blocks for mine (Fig 1.0)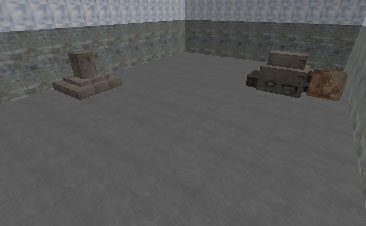
(Fig 1.0) If you want to follow this tutorial its best to download the objectives like in Fig 1.0 here. Otherwise make 2 brushes in an encased level. |
||||
| 2. | You
now need to make the each brush into a "func_explosive".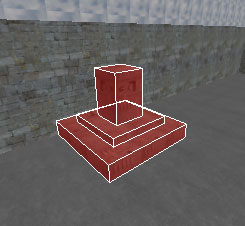
(Fig 1.1) Once ive made the brush a func explosive (select the brush, right click, choose func explosive) then you need to get up the properties window (press"N") (Fig 1.2) 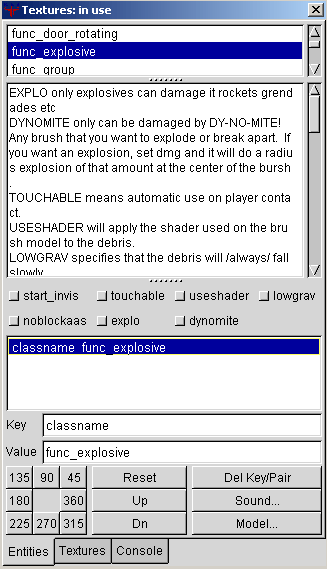
(Fig 1.2) You should have a quick read through the various descriptions (in the window with all the writing in) these windows tell you the key and what value you can type in. Once you have had a quick look through, we now need to add our keys and values for this objective (Fig 1.3): 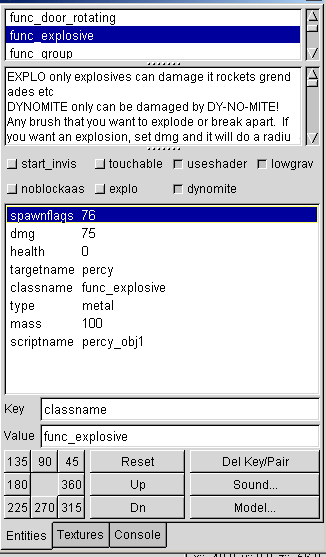
(Fig 1.3) As you can see in fig 1.3, ive entered all the things needed to make this objective work correctly, so you need to do the same, lets go through what each one means: useshader - this button is set to ON because it will use the same shader as the brush has for the debris lowgrav - means the debris falls slowly dynomite - have this selected so the objective can ONLY be blown by using dynamite spawnflags 76 - this is just in relation to the buttons you press in, the number changes depending on what you have chosen. dmg 75 - the radius of how much damage is done, ive put 75, as the default is no damage which is not very realistic. health 0 - vital, means the brush isnt shootable, if you dont use this, this can mean both sides can blow up the objective, which we dont want targetname percy - targetname actual means the name of the selected object, so what we can see is ive called this objective "percy" classname func_explosive - you will know already this is the type of entity you have chosen, and it is displayed automatically. type metal - ive chosen metal here for the type of material, it will also make a metal like sound when broken, if you say chose wood it will make a wood breaking sound when it blows. mass 100 - the weight of the object, the amount in size, the mass! :P ive put in 100, theres a description of the amounts in the descriptions window, I thought 100 was about right scriptname percy_obj1 - this is vital, this directs it to the right place in our script, we havent made our script yet, we will make that after we have finished making our objectives, but this tells the game where to look in our script, it will look for the line "percy_obj1" and follow the code. So thats it for objective 1, its called "percy". Now we need to do the same for objective 2 (Fig 1.4), only this time, we will change the name of the objective and the scriptname, everything else can stay the same. 
(Fig 1.4) 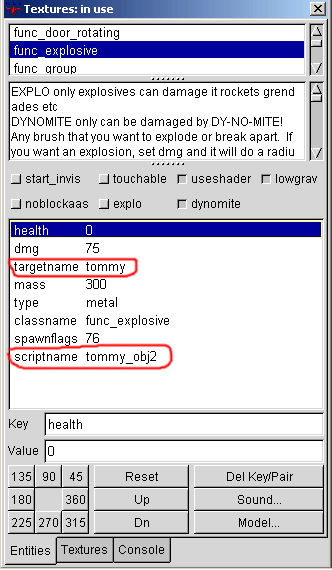
(Fig 1.5) Everything's the same as before, apart from what ive highlighted in red, this objective is called "tommy" and the scriptname is "tommy_obj2". |
||||
| 3. | Now
we have 2 objectives, "percy" and "tommy",
think of "percy" as objective 1 and "tommy"
as objective 2 |
||||
| 4. | Now
we need to place a trigger brush for where the tnt is allowed
to be placed. What you need to do is load up the "common"
texture set and choose "trigger" and then place a
brush around the objective where you want the TNT to be able
to plant.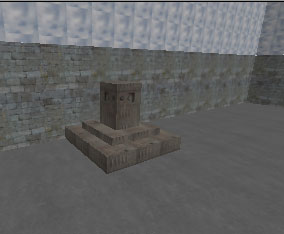
(Fig 1.6) Above "percy" 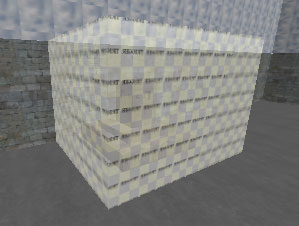
(Fig 1.7) What you now need to do is, with the trigger brush selected, right click and choose "trigger" then "trigger objective info" (if your on 800x600, move the mouse to the very bottom of the menu, then move it across the bottom and then you can get the stuff in the trigger part of the menu as you cant see the text of trigger as it doesnt fit on screen) Press "N" to get up the entity window and you will see the window as in Fig 1.7. We now need to add some more keys and values, ive added the following: 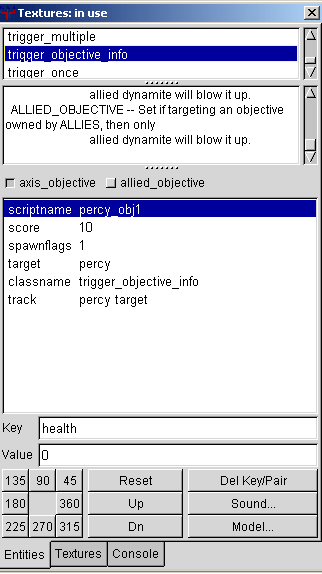
(Fig 1.7) As you can see ive added various keys, you need to add them in too, it doesnt matter what order they appear as long as you have those keys in, so lets discuss them: axis objective - this is set to ON, this actually means that only the ALLIED team will be able to blow this up, as its a axis objective, seems the wrong way round i know! but thats what it is scriptname percy_obj1 - this is what this trigger will look for in our script file that we will make later score 10 - this is how many points youll get when you blow this objective up spawnflags 1 - this has appeared because we chose "axis objective" which means only allies can blow it up target percy - this is our target for this trigger, once the dynamite blows up we want this trigger to be targeting our objective and blowing it up, our objective is called "percy" so thats what we give this a target of classname - automatically inserted, name of entity track percy target - this is what is displayed on screen to the players in game, before this "You are Near" is automatically inserted, ive written in "percy target". So it will say on screen "you are near percy target" when you go in the trigger brush area |
||||
| 4. | We
have 2 objectives, and a trigger brush on objective 1, we now
need another trigger brush for objective 2, "tommy".
So do exactly the same as you did for objective 1.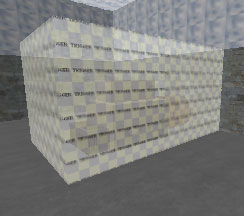
(Fig 1.8) 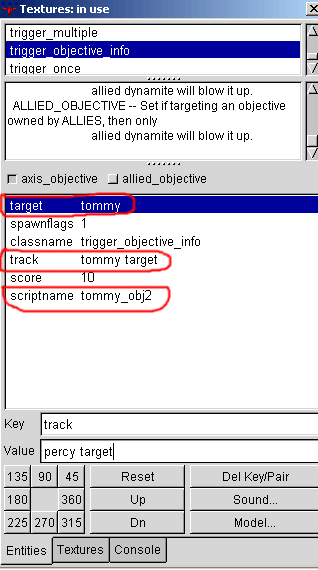
(Fig 1.9) Now enter the same keys and values as before, the ones that have been changed have been highlighted in red, ive changed the "target" to "tommy", ive also added "track" "tommy target" so it will say "you are near tommy target" in game, and finally ive changed the "scriptname" to "tommy obj2" so it looks for that part of our script in the script that we will make in a moment. |
||||
| 5. | Now
we need to add in the entity named "script_multiplayer"
this is so it knows what script title its looking for in our
soon to be made script. Put in the entity by right click and
choosing "script_multiplayer" from the menu. Press
"N" and then all you need to add here is a key of
"scriptname" and a value of "game_manager"
as "game_manager" is the title of our script, most
of the official maps used that name so we will to, to be on
the safe side. Fig 2.0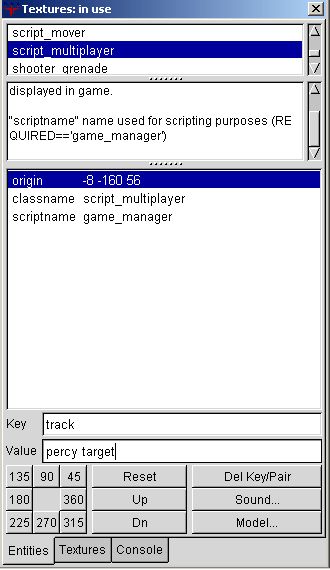
(Fig 2.0) It should now look like the image above, with the "game_manager" inserted. |
||||
| 6. | Now
we have our 2 objectives, 2 trigger brushes, and one "script
multiplayer". We are just about finished on the map side. Remember that the name of your script needs to be the same as your map. So our script will be called "obtest" as thats the name of our map. When we are telling various objectives what scripts to look for it looks within the script for the titles. So as in objective 1 it looks for "percy_obj1", it already knows to look in our script file (obtest) and looks down the text code for the name "percy_obj1" and carries out the code for it. 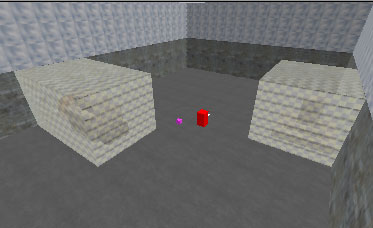 |
||||
| 7. | Now
we need to make our script. To save typing out lots of crap,
I took the mp_base script, copied it and renamed the file to
"obtest". You can download the script which comes with the .map and .bsp here Now your script needs to be exactly like the one in the file, ive pasted it in here too, Im going to explain the vital parts in green, click here to put the script up. |
||||
| 8. | You
should place the script in the same place as your .map and remember
it has to be called the same name. You should now have the following:
If you havent already you can download the script, map and bsp here |
Problems, Comments, Queries > Forum
Tutorial by eyeronik
