Once
you have made your light fitting, if the texture you have used
is light emitting (see the shader or see in map) then you need
to decide how much light you need.
2.
"right
click" a window and then choose "light" from
the menu, a box will pop up with the default amount of light,
which is 300, this is fairly bright, and white in colour, For
most maps this is far too much for indoor rooms, 100 is often
better, you dont want it looking like its full bright and blown
out.
3.
If
you press "N" the entity window will appear. As you
can see in the picture below descriptions of various things
you can do.
To make the light a colour of your choice type in _color and press enter, then highlight _color and press "k" this brings up the colour picker.

Something missing from the above is "fade", I always put in a fade value, simply type fade and put a value like .2 or .3 This seems to improve the way the light looks overall.
4.
Thats
your basic light done, its pretty easy to insert a light. Sometimes
you might want to place a light junior in, its basically like
a light but it lights only the models, useful if models are
going pitch black under a light or something, but you dont need
to place them in all the time.

Lights from textures
If you followed the tutorial for making a room you will already know about these. There are textures in the "lights" texture set that emit light, this is done by giving the texture a shader, to which it directs the engine what properties to give that texture, which in this case how much light, what colour it is etc.
If you wanted to see the properties for these lights above, its named "light_xlight_2500" if you open up the texture window (press t) then you hold "shift" and left click the texture twice the shader will load up, you might notice some textures have a number in there name like in this case "2500" this is actually the brightness, which is entered in the shader which you can see below
(note: if you change the shader it would change this light for everything in game, your better off finding the texture, naming it something else and copying the same shader and editing it, - DO NOT ALTER THE ORIGINAL WOLF SHADERS):
Any texture in the texture window with a white box around it has a shader, so in the light texture set you can see most of the lights have shaders, to which there light emitting details are coded.
Ambient Light / Overall Map Light
This is a simple affair of adding a key to your worldspawn, simply select worldspawn by clicking any brush and pressing "N" then you will get the following screen, without the color and ambient settings, as I put them in:
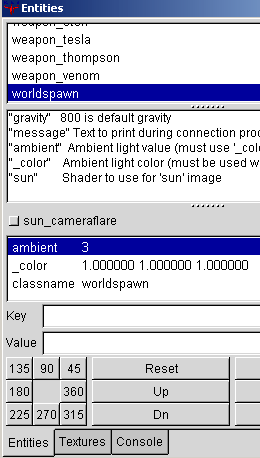
People use ambient setting to get rid of those harsh shadows in game, often you might need a setting of 10-15 depending on the light from the sky. Its easy to do just enter ambient and then a number for the light amount as well as a color key.
Problems, Comments, Queries > Forum
Tutorial by eyeronik
To make the light a colour of your choice type in _color and press enter, then highlight _color and press "k" this brings up the colour picker.
Something missing from the above is "fade", I always put in a fade value, simply type fade and put a value like .2 or .3 This seems to improve the way the light looks overall.
Lights from textures
If you followed the tutorial for making a room you will already know about these. There are textures in the "lights" texture set that emit light, this is done by giving the texture a shader, to which it directs the engine what properties to give that texture, which in this case how much light, what colour it is etc.
If you wanted to see the properties for these lights above, its named "light_xlight_2500" if you open up the texture window (press t) then you hold "shift" and left click the texture twice the shader will load up, you might notice some textures have a number in there name like in this case "2500" this is actually the brightness, which is entered in the shader which you can see below
(note: if you change the shader it would change this light for everything in game, your better off finding the texture, naming it something else and copying the same shader and editing it, - DO NOT ALTER THE ORIGINAL WOLF SHADERS):
| textures/lights/light_xlight_2500 { qer_editorimage textures/lights/light_xlight_02.tga q3map_surfacelight 2500 - its brightness is here, it also uses that number in the name so you know its value without having to look in the shader light 1 surfaceparm nomarks { map $lightmap rgbGen identity } |
Any texture in the texture window with a white box around it has a shader, so in the light texture set you can see most of the lights have shaders, to which there light emitting details are coded.
Ambient Light / Overall Map Light
This is a simple affair of adding a key to your worldspawn, simply select worldspawn by clicking any brush and pressing "N" then you will get the following screen, without the color and ambient settings, as I put them in:
People use ambient setting to get rid of those harsh shadows in game, often you might need a setting of 10-15 depending on the light from the sky. Its easy to do just enter ambient and then a number for the light amount as well as a color key.
Problems, Comments, Queries > Forum
Tutorial by eyeronik
