Making a command map
Prerequisites before completing this tutorial
The first thing to do is to make sure that your map coordinates are square and correct. You command map relies heavily on your mapcoordinates and if they are wrong then most likely your icons that appear on the map will be placed wrong and the scale of your map won't line up correctly with your brushes. Its also a good idea if your coordinates hug close to your furthermost brushes so that way you don't have wasted space on your command map. Revisit the first room tutorial for more on setting up map coords.
-
Next we want to generate a tracemap of our level so when we design our command map we have something to reference it back with. A tracemap is a tga file which contains information about your map in its chanels, for example. The blue channel shows the height of your sky from the ground. For more information on tracemaps check out the LDR at http://www.planetquake.com/simland/ldr1_1/default.htm and goto ->Trace maps.
Now the way to generate the tracemap is to do this:
Load up ET.
Bring down the console with the tilde ` key and type the following.
/g_gametype 2
/sv_pure 0
/devmap my_map
/developer 1
/generatetracemap
The tracemap is then created and put in etmain/maps directory(saved as my_map_tracemap.tga). Once that is done exit ET and load up your texture editor. I'm using Adobe Photoshop but there are alot of different editors you could use, Paint Shop Pro, Corel paint etc. or if your strapped for cash, uni student or like freeware download The Gimp. As long as the editor can read chanels and has layers it should be fine.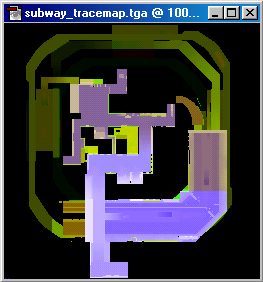
figure 1: tracemap
-
At this point is where your texturing skills will apply with your editor. Effectively what you want to do now is use your tracemap as a guide for making your command map. The next part will show you how to edit a simple command map using Photoshop, and i'll assume you have moderate knowledge of Photoshop. You can choose to skip this next section and just use your tracemap as your command map, and if so go onto point 5, for everyone else follow on.
-
- Copy the tracemap from the maps directory, paste it into the etmain/levelshots directory and rename it to mymapname_cc.tga. If the levelshots directory isn't there create the folder.
- With the editor loaded up, open the mymapname_cc.tga file.
- Select all in the background layer, then in the channels, clear all channels except for the red channel(red channel contains most of your brush work). See figure 2.

figure 2 - Now make the image mode greyscale, copy the background layer, then paste that into a new document, in a new layer called buildings. See figure 3.
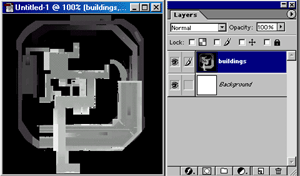
figure 3 - Finally convert the new document's image mode back into RGB. When Photoshop asks you whether to flatten image when changing modes, press don't flatten.
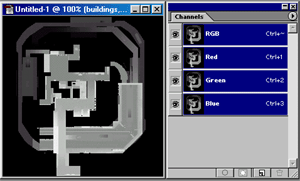
figure 4
- Now select the buildings layer and goto edit>extract. The extract window allows us to cut off all the black areas around the buildings.
- In the extract window, highlight around all the grey areas and highlight any black bits in the inside by using the highlighter tool.
- Now get the fill tool and click it anywhere inside the highlight. Once done clickok.
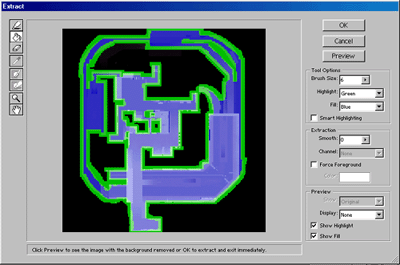
figure 5 - Create another new layer between buildings and background and call it terrain. In this layer we will create the terrain.
- The best way to do the terrain is to use the path tool. Create the path lines, then fill
in the layers between your paths using the paint bucket tool. It's best if you lock the
buildings layer so you can't accidently put your paths on the wrong layer. For information on how to use
the path and bucket tools look through Photoshop's help files.
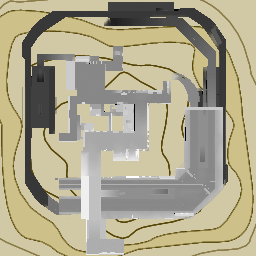
figure 6 - Now if you spend a bit of time and play with filters, opacity and other features you should be able to
come up with something like figure 7. Have a look at here
Schaffer's website for some ideas.
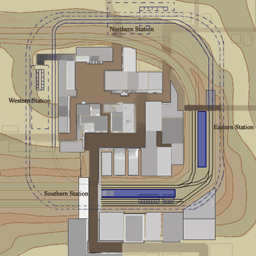
figure 7 - Lastly goto edit > flatten layers.
- Ok now we need to save the file again. Make sure that its saved as an 24bit tga file.
Now its time to make the shader for your command map. Open up notepad, and we'll immediately save the file. Go to Save as, in save as type, select all files, then go to etmain/scripts folder and save the file as mymapname_levelshots.shader
Now its time to include all the shader details, the best way to do this is to just copy everything underneath into notepad and change mymapname to whatever your map name is.
levelshots/mymapname_cc_automap
{
	nopicmip
	nocompress
	nomipmaps
	{
		clampmap levelshots/mymapname_cc.tga
		depthFunc equal
		rgbGen identity
	}
}
levelshots/mymapname_cc_trans
{
	nopicmip
	nocompress
	nomipmaps
	{
		clampmap levelshots/mymapname_cc.tga
		blendfunc blend
		rgbGen identity
		alphaGen vertex
	}
}
Thats it for the shader file. Now just save the file again.
So now we have the command map and we've made the shader file which ET uses to make it appear in the limbo, HUD etc. It's time to load up that baby and and have a look.
Problems, comments, queries > Forums.
Tutorial by Ausman
Edited by WeblionX
