How to make pk3 (for winzip version 8+)
Distributing your completed map(s) in a .pk3 file is certainly the preferred method. This tutorial will show yo how to do this, which is very simple. You must have WinZip to do this, and this tutorial is based on the latest version, which is currently 8.1. An explanation of the RTCW folder structure must first be given.
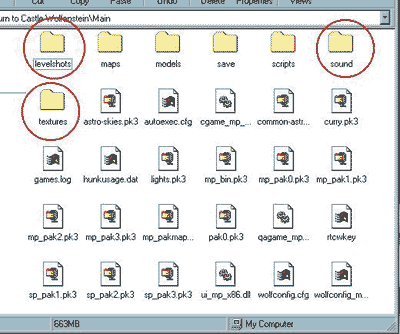
Within the RTCW folder, there is a Main folder, and within that folder there are many others. It is within these that all of your maps and stuff for these maps are held. Some examples of these folders would be sound, textures, models, and maps. However, right after you install RTCW, you might notice that there are only four of these folder: maps, scripts, save, and models. The reason for this is because everything else is stored away in .pk3 files, which are also in the Main folder. This not only keeps things organized but also condenses the file sizes. You must understand, however, that to the game it makes no difference whether a file is in a normal folder in the Main folder or if it's in a .pk3 file. As long as the paths are the same, it'll still work. So, at this point you may wish to create these folders, so that way you can just drop in any custom stuff you may have. For example, if you have some extra sounds, make a sounds folder. If you don't have any custom sounds, then don't make the folder. I'm sure you understand. Below is a screenshot of the Main folder, with some folders that I've added circled in red.
So, basically want you want to do is make your maps, put them in the maps folder, and put any other custom stuff you may have in their appropriate folder, also. Now, once you're done, you could very well just give everyone these files and tell them to put them in their respective folders, but that'd be a major pain. This is why we take all of the custom stuff and put them into a .pk3, because, like I previously stated, as long as the paths are the same the game will still be able to find it. So, whenever you're ready, select all of the folders that you need to (hold down Ctrl and click on each one). Then make a copy of them. It doesn't matter where, this is just temporarily. Then rename them to take out the 'copy of' part. Then, from these copied versions, delete everything that you do not want to distribute. The reason why we don't just use the originals is because you might not want to include every file you have in those folders. This way the originals are safe, and you'll only modify the copied ones. Once you only have the content that you want in these folders, select them all again and right-click on one of them. Point to WinZip, then click on Add to Zip file... Check out the screenshot below. (Notice that I'm doing this is my unzipped folder, because it doesn't matter where they are, as long as you're doing this with your copied versions of your folders and not the originals.)

At the top of the window that appears, make sure the path leads to the RTCW\Main folder, and give the .zip file a name. Also be sure to change the extension from .zip to .pk3. Make sure Save full path info and Store filenames in 8.3 format are NOT checked. Once this is done, simply click the Add button. See the screenshot below.

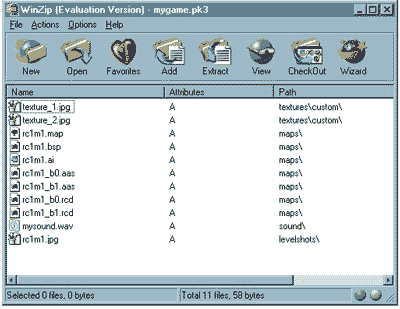
You should now have a .pk3 file in your \Main folder with the name you specified. In you open it up, you should see all of the files that were in your folders, and you should be able to see all of their paths at the far right. As you can see, they are all the same as they were before, so RTCW should still be able to find them. See the screenshot below.
That's it. Now just give people this .pk3 file, and instruct them to put it in their \Main folder. They can then load your map(s) from the console, and RTCW should find everything it needs to.