Making your first room
Prerequisites
If you have never used radiant before you would benefit a lot from reading the Basic Construction and Getting Started tutorials, but if you have done some editing and know how to move about in it you should be okay following this.
Creating a Basic Room
Load up radiant and set your grid size properly. For this tutorial I'm using grid size 16. You can press 5 to select that grid size directly, select it from the toolbar, or use the bracket keys ([ and ]) to cycle through the grid sizes.
To get started, we need to select what image (known as a texture) will be applied to brushes. Load the textures view if it's not already open by pressing T, then select the common group in the left side of the texture window, then select caulk on the right. Using caulk will simplify mapping as you add more brushes.
Using the top view (see the below icon) create a brush 320x320x16, this is our floor. To do this look at the grid numbers and left click and drag out a box 320x320 in top view. Then in a height view window make it 16 high, which is one grid unit. Look below for more information on how to make a brush a specific size.
- Top view is the Y/X view, its the view of looking down on your map and one of the most used windows in mapping. It should have the letters and lines something like below:

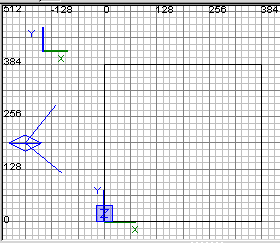
- To make a brush a certain size, if you look at the left and top parts of a window there are numerical values, starting from 0, they are multiples of 16 with our grid set to 16, which means each block is 16 pixels in size. As you may see the values go from 0, 64, 128, it is giving the values every 64 pixels. So if you want a 384x384 floor then look at the grid and make your brush like below.
- To automatically display the size of a brush, press "P" or go to "edit" then select "preferences", then in the "2d-display/rendering" section press the button for "display size info" this will now show the size of your brushes as you drag them out.
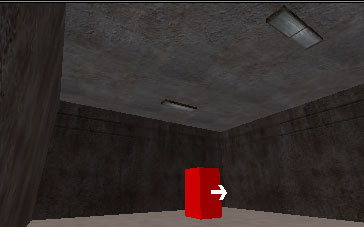
Now we have a floor we need 4 walls, but before we make them, we should place in a "info_player_start" to do this right click a window and then the entity list will appear, chose "info" then "info_player_start" and it will appear in the window. Entities are items such as lights, doors, buttons etc, there basically items that are already created, like lights, or items that you can turn into entities, like doors.
Align your info player start up generally with the floor, it doesn't have to be accurate, with our current grid size it wont align with the floor exactly, in game its best to be slightly above the floor so that when the player spawns he wont get stuck in the floor. We are putting in a info_player_start because this is our player, we can keep things to scale better by looking at its size, we don't want to be making doors the size of garages and windows the size of mountains now do we :) He is basically how big a player is.
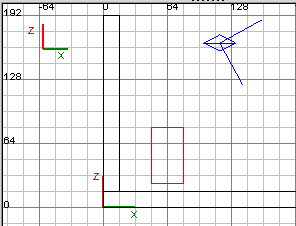
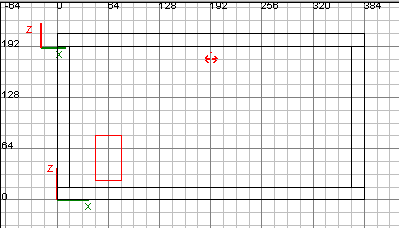
Now build the walls, Starting from the bottom of the floor ive went up to 192 in my height window in Fig 6.1 and then in topview in Fig 6.2 Below, ive only made one wall so far.

When you are making the other walls, dont overlap anything, its never a good idea to overlap brushes in mapping, by this I mean brushes going into other brushes, ours are overlapped in a sense but since most buildings are seen from outside as well as inside they need to be, if your room is only visible from the inside you should align the walls differently like in figure 5, he we can see there's no overlapping of a sort.
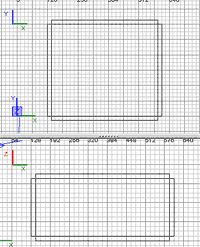
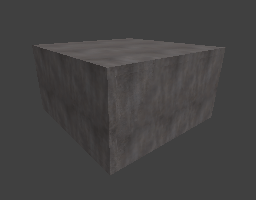
Once you have 4 walls and a floor, complete the room by adding a ceiling, make it 16 high, which is one grid unit, the same size and height of the floor. You should now have something which resembles a hollow cube like in figure 6
Styling the Room
Now rather than just have everything boring and grey, we are going to texture our room. Click "textures" on the toolbar and then choose xlab and then xlab_floor now in your room select the floor brush and then press T chose xfloor_c07 then turn off the window. From the list a cream tiled floor should appear, it looks good, so thats our floor done.
Now for the walls, click "textures" then select xlab then xlab wall. Then select either a whole wall brush or the visible face of one, and press "T" to bring up the texture window and then choose xconcrete_c03", this texture will now cover that wall, then you want to align it a bit better, so press "S" to bring up the surface inspector. I decided to press "Fit" and then change the "horizontal stretch" values to something less so it isnt as stretched, I changed it to the same value as in "vertical stretch" in this case its 0.68750 so I just popped that in.
Now you need to have that texture on the other walls, hold "ctrl and "shift" and then left click one of the walls faces, then move the cursor in the camera over the wall we just textured and press the middle mouse button. The texture and setting should appear on the wall, you can do this for the rest of the walls or you can keep "ctrl" and "shift" held down and just move the cursor in the camera over the walls and press the middle mouse button. You can have to do this, its just quicker and better, you can texture each face using the surface inspector if you wish.
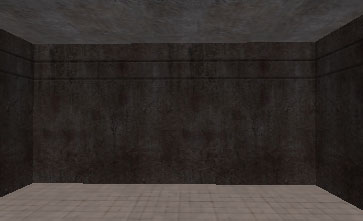
We now have 4 walls and the floor textured, I then chose "textures" then "xlab" then "xlab_wall", I then selected the ceiling and applied the texture "xconcrete_c03" (by pressing "T" to open up the texture window and left clicking the ceiling in the camera view). The texturing is now done.
Lighting can be a complex thing and getting it right often takes a few attempts to get it how you want, you also should place "lightjuniors" in on your maps to light the models as they pass near the light
Some textures in RTCW are lights, and they do also give off light, sometimes this might mean you don't need a light entity in or you only need one with a small value.
Lights
We also now need some light. You can do this 2 ways, the most common way is to right click then select "light" from the menu, then enter a value in the pop up window (or leave it at 300) lower values are darker, higher values are lighter (see the image below, the red diamond is the light). You could then move onto step 10 if you wanted, but your lighting would be poor, its up to you, either place in that light, or follow what I did so that the light looks decent and not so much like a "tutorial room" :)
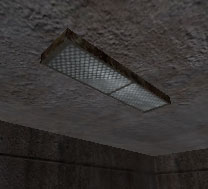
So if you've decided to follow this, what I've done is made 2 small rectangular brushes made up of the "textures" "metal_misc" set and the "ametal_m07a" texture,
First off in top view I made a rectangle 64x16, I then changed the grid size to "grid 4", to get it to grid 4 you can use the "[" or "]" keys or just press "3". In the height view (z), I made it 1 unit thick (4 in numerical grid terms as now each unit is "4" pixels) then I chose the face that is facing down on the room and textured it with the lights/light_xlight_2500 texture like in figure 9 below
I then had one light brush, so I selected it and pressed "space" and it copied and pasted one, so I placed that over the other side of the room like in figure 10
These lights will actually give off light, because the light texture we applied has special values in its "shader" to give off some light. Its only a dim light but works well in this small room. You can also right click and choose "light" then enter a number in the pop up window, like I said before (lower numbers are darker) and move the light where you want, but for this room we made we dont need any.
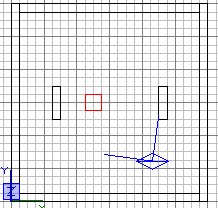
This is the top down view of the room (see above), as you can see the lights are the 2 small rectangles and the red square is the info_player start we placed in earlier, it could almost be a game of the old classic, Pong.
Please note that you must use an up to date version of q3map as an earlier version of q3map has a mistake in it which cause the game to crash if you have "light" textures in. (this version works, by now there will be newer q3map versions out, check the links page for newer ones if you want to update)
Bear in mind that when lighting your maps you will mostly be placing in the "light" entity as well as light textured brushes.
When you select a light and press "n" to bring up the entity list, you can choose to enter lots of values, its a simple process of entering in the "key" the name of the process, like "radius" and then in the "value" writing in a number such as "128" then pressing "enter" and that choice will be on that light.
Hold up, we are almost finished. Select any brush in the room and then press "N" this will bring up the "Entities" and it will have selected "worldspawn". Which is an entity which contains information about the map, some general settings so to speak. In the "key" field type in "ambient" and in "value" put "3" then press enter. This makes the shadows more realistic and less dark. Then type in "_color" and press enter, then select it so it is highlighted in blue with the yellow line around it and press "k" a window should pop up,leave it as white and press "ok" This is the colour of your ambient light.
Loading the Map In Game
To compile it, for now do it the simple way, click on "bsp" on the toolbar at the top, and then choose "BSP, -vis -light -extra" and some windows will pop up and when they've all gone off ( Theres 3 I believe) your map is done.
There are a variety of ways to compile, using the in-house radiant method isnt the quickest or most efficient, to learn about compiling and the different methods and how to do them, visit the compile page.
Load up rtcw and bring down the console, normally by pressing the "`" key which is just below the escape key. Then type in /sv_pure 0 which turns off pure files as we have made a custom one. You must type this is or it will say "bsp not found" when you try to play your map, then type /devmap mymapname and it will load up your map. If your making a single player map type in /spdevmap mymapname if you just use "map mymapname" the sounds in single player dont come on and you cant use the cheats either.
So we are all done, Marvel at your room in rtcw! and feel proud of creating your first piece of map!!, from here on you will find it a frustrating, annoying, rewarding, pleasing and exciting journey as you make your maps on the road to becoming king mapper. You should also give yourself a pat on the back!
Important Notes
caulking, this is applying a texture called caulk (which is found in the common texture folder) to any faces that you cannot see. This means the game engine draws less which means higher fps and lower rspeeds (rspeeds are the number of tris on screen etc, the higher the worse) Some mappers make there maps out of caulk first entirely and then put the texture they want to be seen on the faces. Remember that if a brush is entirely made of caulk (on all its faces) it will cause a leaky effect, it will seal the level but it will be a see-through brush.
Leaks, you might not know what these are yet, when you create your world in radiant you need to make sure it is sealed off some the grey, think of it like the earth is sealed off from space, we need to seal our map off from space, things that cause leaks are entities, these cant seal the void, and gaps where you havent sealed everything off. Radiant has a built in leak finder, try compiling in radiant, if theres a leak it will stop and normally a red line comes on showing you where the leak is at the end of the line if the line doesnt appear and its saying there is a leak, you can also go to file and then pointfile.