Easygen Terrain
First of all i want to say that this is only a short-walkthrough. It's meant to tell you how to install easygen and make some simple terrain in a short time. Get further information at planetpointy where they have a more complete tutorial!
1. Now lets begin - first of course you have to download easygen which you can get (at the moment) here. As it doesn't need to be installed just unzip it to some folder and start easygen. you'll get a wizard which will ask you for some settings. These are:
- Export folders:
- Import folder:
work mod: wolfenstein\main folder
bitmaps: wolfenstein\main\maps (just an example you don't have to take this one as you won't need the bitmap anymore after having created the map
bitmaps: can be wherever you like. it's only the place easygen looks at to find your heightmap - i ll describe the expression later!
leave all other settings as they are and click ok.
2. Now we have to create a heightmap. You can use any graphics-program you like, you can even paint it manually and scan it then. all that counts is that it has to be an 8-bit grayscale image with a size of 33x33 pixels. This is my example (in jpg form):

You'll say 'What? I have to make detailed terrain with this little image?' and - yes you have to and it's a pain in the ass in my eyes but you get used to it...
3.Go back to easygen and click on file>import>heightmap. If you don't have placed your bitmap in the import folder we set at the installation you will have to browse for it manually. You'll see a small preview window for your picture and on the right side there is a field where you can enter a number. This is the height of the map, predefined to 256 which is smooth hills, change it to 1024 so we get some little mountains and press ok. You should see something like this:
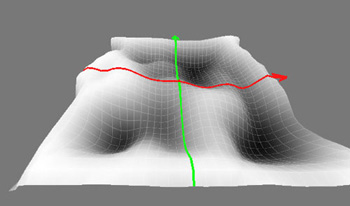
You can move around with your mouse. Press right and left button to move up and down, only the left button to rotate your view and look up and down and the right button to move horizontal.
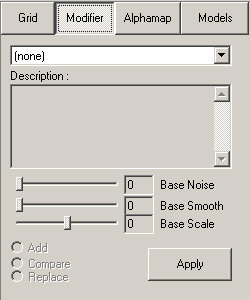
4. Next we want to change some details of the terrain. At the moment we have the grid view so click on modifier. Here you can choose a tool to modify your map. For example take the scale-tool. Hold shift and the right mouse button and go up and down. You'll see that you can change the height of your map with it. Try the other tools as well but i suggest not to change too much, as you can fuck up your map very easily with these tools ;o)
5. We have changed our terrain now and want to paint textures on it. Normally you don't have your textures unzipped in a folder but for this purpose you need to but of course only the terrain textures. You can find them in your wolfenstein\main folder in the pak0.pk3 - just open it with winzip for example and unzip the terrain textures to some folder. Now that we have done this click on alphamap then select in the menu terrain>add folder and choose your terrain-textures folder. The textures should now show up at the left bottom window. To create our alphamap click on one of the black areas. A wizard will show up which asks you for a colour, give it green, then choose from the textures folder some grass texture. Do the same for 2 other textures, i chose mud and a cliff texture.
6. Now we have 3 textures which we can paint on our terrain. choose the texture you like by clicking on the colours you gave them, hold Ctrl, shift and left mouse button and paint the chosen texture on your map. To make it easier for you to imagine how it will look like choose from the view menu the textures-view. If you see black triangles then that's because you have 3 textures at one place so you will have to paint them always in a way to prevent that. I know this is ugly but it's ok for showing:
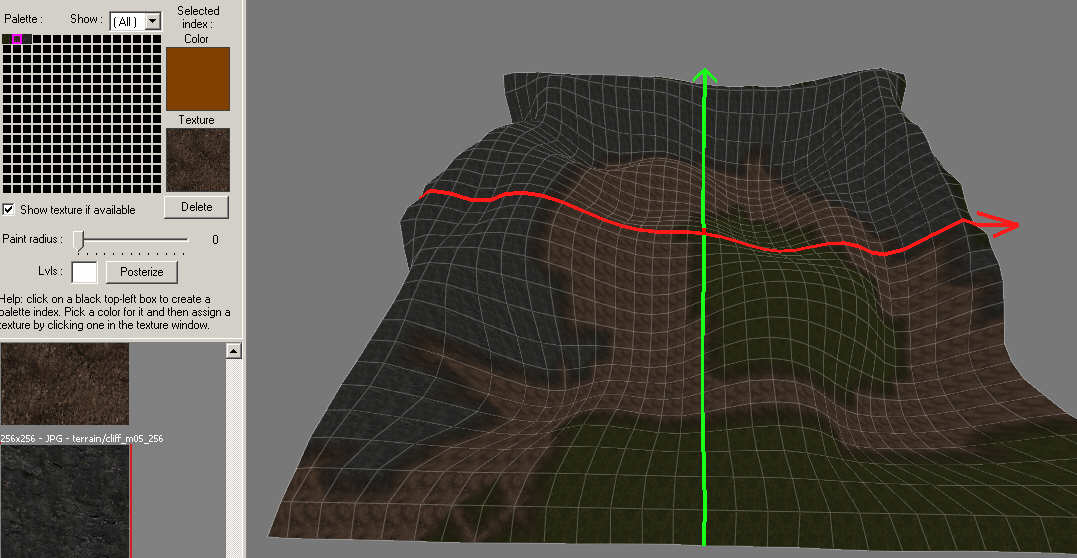
You can see the single tiles on this and so it doesn't look like real terrain. This is because the textures are to small. Simply press + and - to change their size.
7. That's basically all now we have to export our map so we can work with it in radiant. click on exp map on the menu bar. This window will appear - enter everything like i did:
You can't see that here so i' ll tell you: the alphamap has to be in the main-folder, and the metashader in the scripts folder. I am not sure if they all have to have the same names as the map but to be sure do that. When you entered everything click on continue. You will be asked for the map name, take 'terrain_tut' and save it in your maps- folder.
8. Now open it in radiant - you'll see that your sky-box is completely caulked so select all sides and choose some sky-texture, i chose mx_forrestsky2 as its bright and you can see everything well. Save your map again and compile it. Now we have some terrain, you'll say it's way too small but it's ok for our purpose now.
More Terrain Resources:
Manual Location (check the gtkradiant folder) (online version)
Easygen Tutorial (check the folder in the program!)
PlanetPointy's
Easygen Tutorial
Q3Workshop
Terrain Tutorial (simple)
Q3Workshop
Terrain Tutorial (advanced)
Terragen
Tutorial from claudecs
Gensurf
Official site
Snicks
Terrain Tutorial