Basic Construction
Prerequisites
If you have followed the getting started tutorial, you should be all set up to begin mapping. If you haven't you might want to check it out, as it goes over required software and configuring Radiant.
Essential Interface Functions
The Grid
Before you start mapping you need to understand the grid. It differs slightly from other editors you might have used such as UTed and WC/Hammer as you'll want to keep snap to grid on almost all the time. The smaller the grid, the harder it is to keep everything aligned and the more you have to zoom in to align things, so keep the grid as large as workable for what you're making.
You can use 1 to 9 to adjust the grid from 1 unit to 64 units (doubling each time). 5 (grid size 16, see figure 1) is recommended for large structures, but you can use smaller grid sizes as details require. You can also use the [ and ] keys to cycle through the grid sizes, or go to "Grid" in the toolbar. To zoom in and out of the map, use the mouse wheel. As a note, 0 toggles the grid view on and off, but doesn't toggle snapping to the grid.
Moving Around
Now you know about the grid, you need to know how to actually make things and what keys to press. Most mappers call produced objects they have made "brushes" so if you here "I made a brush" it means "I made a shape" its basically just about anything you construct is referred to as a "brush".
Creating Shapes
If you hold the left mouse button down on on top view (marked by the Y-X icon as shown in Figure 2) 
Moving and Resizing Brushes
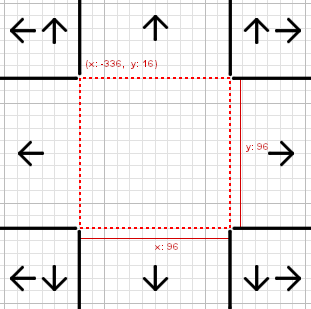
You can adjust the size by clicking and dragging on the area outside of the shape. Where you click will determine which sides will move. For example, clicking and dragging in the space to the upper-right of the brush will move the top and right sides of it. See Figure 4 for all options. You can also move the shape by clicking and dragging inside it.
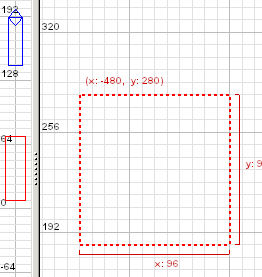
You can now make a rectangular brush with any width or length, but it only has the default height. To adjust how tall it is you need to drag its top or bottom edge in a Z-axis containing view (the Z-axis represents the "height" dimension in game). In the default Radiant layout, the left-most window is a Z-only view (see Figure 5), but if you are using a different view, you may have a Z-X and Z-Y view instead. Click above the top or below the bottom of the it, then move the mouse to move that face (top or bottom) of the brush, like you would to adjust the width or length.
When you are happy with it, deselect it by pressing Escape, holding Alt and clicking anywhere in a 1D/2D view, or by going to "Selection" in the toolbar then clicking on "Deselect". Its outline will change to solid black (Figure 6).
To select a brush, hold shift then click on it in any view, including the 3D view. You can select as many brushes as you want this way. You can duplicate all selected brushes by press Space, too.
Camera Overview
While the 2D (and 1D) views are great for laying out major landmarks in a map, understanding the fine details get murky without seeing them the same way you would in-game. You can use the camera view to see how things actually look in full 3D (see Figure 7).
Basic Camera Usage:
Click the Right Mouse Button on the camera view to enable free-look. While in free-look mode, you can move your mouse to point the camera in the direction you want to look, and use the mouse wheel up/down to move forward/backward. Additionally, you can use the arrow keys for directional movement, similar to how you might use W/A/S/D to move in game. Additionally, you can move up and down using D and C, as there is no "jumping" in the editor. You can see where your camera is in the 1D and 2D views based on the blue camera symbol, as seen in Figure 5 and 8.
These are the fundamentals of movement in the camera, so have a play around with that, you should see the shape if you created it and you will see that its not got a proper texture on it (see Fig 7) unless you applied one.
So theres the basic shape (Fig 7), you could of made it a variety of sizes. It will either have the blue and black "shader not found" image on it. Basically because we didnt load any textures. That in itself is another tutorial, but radiant follows the pattern of you must load up the texture sets and then apply them, or load the texture, select it and then make your shape. If you see on the toolbar "textures" and then click it, down the menu at the bottom are all the texture packs, starting with "alpha". If you click on one, there will be a short pause and it is loading the texture pack up, if you have a window set to display the textures they will appear, if you dont you need to press "t" to pop up the window containing the various textures from the pack you just loaded.
Applying Textures (Basic)
(full tutorial is here) Now we have our texture window open, (if you have skipped to this part, just go to "textures" in the toolbar and choose a texture, then press "t") we need to select our shape, which we do so by holding "shift" and clicking the shape with the "left mouse button" in the camera view, it will then be highlighted in red as in Fig 1.4.
Now just click a texture in the texture window and it will then texture the shape. Then press "escape" to deselect your shape.(You can see the textured shape Fig 1.5)
I chose to load up the "assault" texture set and chose the texture "awall_m04" it looks pretty dark in the camera view for me so what I did is increased the brightness so I can see better, you can do the same if you want, to do so go to "misc" in the toolbar then "gamma" and select a lower number like 0.5 etc. to make it lighter.
There is a tutorial on texturing which you might want to check out for the advanced texturing methods, if you press "s" now you can see the texture applicator which is discussed in that tutorial.
If you are just starting out, perhaps you might want to move onto the next tutorial Making your first room you will learn more about texture application in that tutorial.
Important
Caulking, this is applying a texture called caulk (which is found in the common texture folder) to any faces that you cannot see when you are playing the game. This means the game engine draws less which means higher fps and lower rspeeds (rspeeds are the number of tris on screen etc, the higher the worse) Some mappers make there maps out of caulk first entirely and then put the texture they want to be seen on the faces. Remember that if a brush is entirely made of caulk (on all its faces) it will cause a leak. In a nutshell you have to seal your level off from the void, if there is a gap this is called a leak.
Further Reading
You can find all sorts of detailed information in the Radiant manual, available in Gtk Radiant via the Help menu (F1). Current versions of Radiant do not include a local copy, but if you want one you can download it from the GtkRadiant github repository. If you're using an older version that includes it, it's located in the same folder you installed Radiant to.